Did you know that creating a beautiful, cohesive candle set can cost as little as $9, dramatically less than what you might spend in a retail store? This surprising figure highlights the incredible potential of DIY home decor projects, transforming everyday items into elegant furnishings. The video above showcases several ingenious ways to elevate your living space without breaking the bank. Let us delve deeper into these creative endeavors, providing enhanced guidance and additional considerations for your own budget-friendly home transformations.
Unlocking the Potential of Dollar Tree DIY Home Decor
Embarking on budget home decor projects offers a uniquely satisfying experience, allowing you to infuse your personality into every corner of your home. Utilizing inexpensive materials, especially those readily available at dollar stores, empowers you to experiment with various styles and themes. Imagine achieving a designer look for a fraction of the cost, making stylish living accessible to everyone.
Furthermore, the process of Dollar Tree DIY crafting provides an excellent creative outlet. You are not merely saving money; you are actively engaging in artistic expression. This approach fosters ingenuity and resourcefulness, turning a simple shopping trip into a quest for hidden design potential.
Crafting Elegant Candle Displays on a Budget
One of the most impressive transformations demonstrated involves creating a sophisticated candle set using simple Dollar Tree candle holders. This project exemplifies how modest components can assemble into a statement piece. Consequently, understanding the structural and aesthetic considerations becomes paramount for achieving a polished final product.
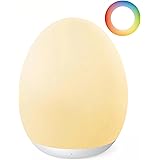
To replicate this stunning inexpensive decoration, carefully gather six identical candle holders and three LED candles. The use of LED candles is crucial for safety and longevity, eliminating the fire hazard associated with open flames. Moreover, a reliable hot glue gun will serve as your primary tool for assembly.
Begin by securing two candle holders together, forming a taller base for one of your LED candles. Subsequently, repeat this process by stacking three candle holders to create an even grander elevation. The remaining single candle holder will complement these arrangements, offering varied heights within your display. Always ensure a firm bond between each component, allowing ample drying time for the glue to set completely.
Designing Glamorous Mirror Coasters with Ribbon
Transforming mundane mirror coasters into glamorous decorative accents offers another fantastic opportunity for creative crafts. This project demonstrates how a simple piece of wide ribbon can significantly alter an item’s aesthetic appeal. Imagine setting drinks down on a coaster that perfectly matches your party theme or existing home decor, adding a touch of personalized elegance.
For this charming DIY, you will need several mirror coasters and a spool of wide ribbon, ensuring it is sufficiently broad to support a glass without tipping. The selection of ribbon allows for immense personalization, from velvet for a luxurious feel to burlap for a rustic charm. In addition, a hot glue gun will be essential for securely attaching the ribbon.
Carefully lay your chosen ribbon across the mirror coaster, ensuring a slight overhang on both sides. This excess ribbon is crucial for creating a clean, seamless finish when glued to the back. Use the hot glue gun to apply a line of adhesive in the shape of an “I” down the center of the ribbon, firmly pressing it with scissors or a non-stick tool to prevent burns. Apply additional layers of glue to the sides and back, reinforcing the bond to prevent peeling over time. This meticulous application ensures durability and a professional appearance for your newly styled home styling accessory.
Creating Cozy Tray Decor for Inviting Spaces
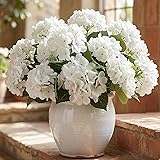
Introducing a cozy tray display into your home instantly elevates the warmth and inviting ambiance of any room. This DIY project combines natural elements with ambient lighting, crafting a serene focal point. Imagine unwinding in a space where every detail contributes to a sense of calm and comfort, all thanks to thoughtfully arranged affordable home decor.
To assemble this comforting vignette, select a decorative tray that complements your existing decor. You will also require two bags of white rocks, three candles, and a collection of pinecones, which can be gathered from nature or purchased. Furthermore, if you collect natural pinecones, consider painting them for an extra touch of personalization or preservation.
Begin by distributing the white rocks evenly within the tray, establishing a textual base. This layer also provides additional height for your candles, enhancing the visual depth of the display. Next, artfully arrange the three candles and pinecones among the rocks, creating a balanced and visually pleasing composition. Should you possess any leftover acrylic gems or small decorative elements from previous crafts, incorporating them can add a subtle sparkle and a touch of glam to your room transformation.
Constructing Dramatic Foam Board Wall Art
For those seeking a bolder statement, constructing dramatic foam board wall art provides an exceptional opportunity for personalized decor. This project transforms humble craft store materials into an eye-catching focal point, perfect for any room or event. Imagine guests admiring a bespoke art piece that mirrors high-end designs, completely unaware of its budget-friendly origins.
To embark on this ambitious yet rewarding DIY, gather six foam boards from the Dollar Tree, three packs of large decorative plates, and two packs of small decorative plates from a craft store like Hobby Lobby. You will also need three packs of ring hangers, Gorilla adhesive glue, and a caulk gun, which are typically available at Walmart. These materials form the foundation of a robust and visually striking display.
First, create the sturdy base by applying Gorilla adhesive glue generously across one foam board, then firmly pressing a second foam board on top. This lamination provides extra thickness, crucial for supporting the weight of the plates and the ring hangers. Next, enlist assistance to measure and mark the precise locations for the ring hangers on the top edge of your doubled foam board, ensuring an even hang. A measurement of approximately three by four inches from the edges for each hanger offers a balanced placement.
Once the back panel is prepped, begin arranging your large decorative plates on the foam board to confirm the desired layout. Subsequently, glue these larger plates securely into position. After the primary plates are affixed, strategically place the smaller plates in their designated spots, whether in the center or along the edges of the larger plates. This layering creates depth and intricate visual interest, culminating in stunning DIY home decor wall portraits. The beauty of these pieces lies in their versatility, as plates are often available in various colors, such as gold or silver, allowing for diverse thematic creations.